Building an Electric Cello

I used to play cello when I was in my early teens. For the past several years I’ve wanted to start playing cello again. However, the problem is that I currently don’t have proper storage space for an acoustic cello. Besides taking up space, an acoustic cello has to be treated tenderly. While it is not super fragile, it is not the sort of instrument that you want to just aggressively shove into a closet. I realized that a solid body electric cello, when put in a soft case, could be shoved in a closet without much fear of damage.

Photo 1: Rough cut of the neck / head.

The one thing I hate about acoustic cellos is the wooden tuning pegs. Anytime there is a drastic change in humidity the instrument can go greatly out of tune, and it can be very difficult to get it to stay in tune. Thus I looked for electric cellos that had electric bass style tuners. I could only find one such instrument in my price range, and the online reviews were not great.

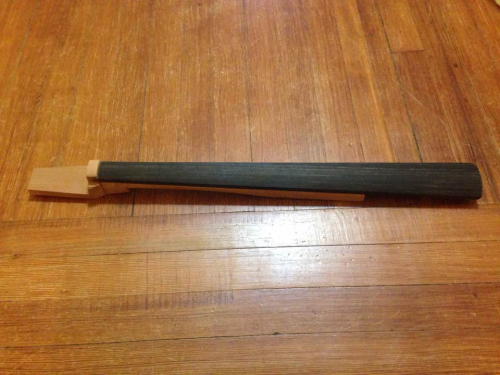
Photo 2: Neck / Head with nut and purchased fingerboard attached.

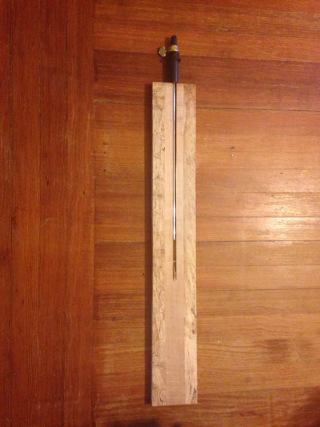
Photo 3: One of the boards for the body with a channel cut for the endpin.

Thus, with Professor Gernes serving as an advisor, I decided to build an electric cello. I found a design online that seemed suitable. I made a couple of changes. I decided to make the head and neck out a single piece of wood instead of using separate pieces. I also decided to make the body a little thicker, and make it out of two pieces of wood, which allowed me to cut a channel down the center of the instrument, yielding a place to put an endpin.

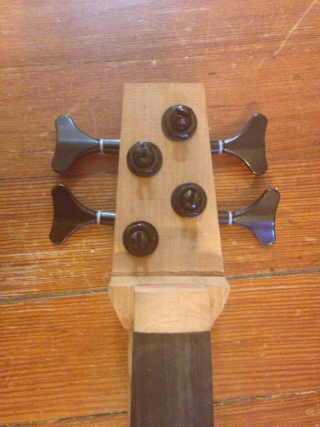
Photo 4: A test to see if the tuners fit.

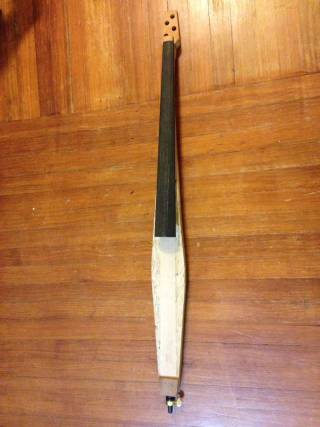
Photo 5: Neck / head assembly attached to the body (via a neck plate), with the endpin inserted. Note the piece of wood added to the body near the endpin (the wood seemed a little narrow on the face where the endpin is, so I thickened it a bit).

The design I used did not account for a solution for a belly rest or a place for the legs to grip the instrument like an acoustic cello. Several people online came up with their own solution to the problem, but I did not like any of the solutions I saw. Eventually I came up with the idea of bending copper pipe in the same manner of the volume antennae for a theremin, allowing for a lightweight modular way to build out from the instrument. However, I was not able to bend the pipe with a tight enough radius without putting kinks in the pipe (even though I had used a set of pipe bending tubes). I came up with the solution of using small pieces of wood that would be connected to the body using copper pipe, utilizing compression fittings attached to the side pieces and body of the cello.

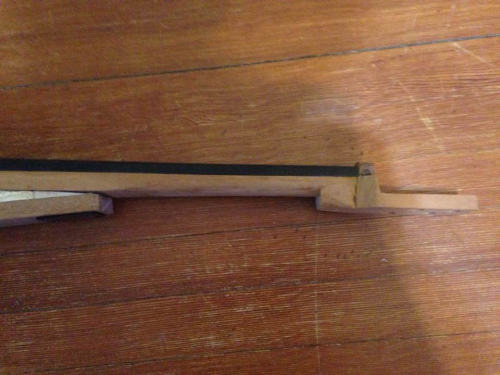
Photo 6: A profile of the neck showing the cut down from the neck to the head. Note that I later carved down the connection between the neck and head so that it is smoother.

Photo 7:  Here I’ve added compression fittings to the body for the side pieces and the belly rest, with the belly rest in place using copper pipe to connect it.

I built the instrument using a small amount of finished pieces. I bought a fingerboard, an endpin assembly, a bridge, tuners, and a tailpiece (though I have been carving a tailpiece that I may use to replace the manufactured one I’ve been using at some point). The piece is finished using five coats of tru-oil. One mistake I’ve made in building the instrument is that the strings a bit high off of the fingerboard near the nut. This is easily fixable though by simply filing down the grooves for the strings in the nut. Initially, I made the mistake of buying cheap tuners. This made it so I could not bring the A string up to pitch. Since these photos I have replaced the tuner on the A string allowing me to bring it up to pitch.

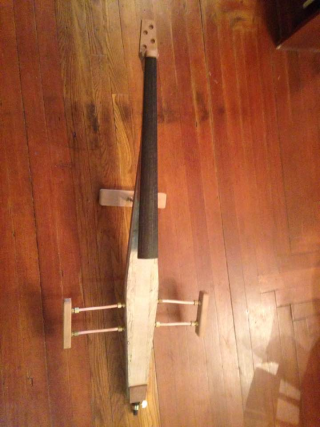
Photo 8: Side pieces and belly rest are added. Note that the side pieces and belly rest can be easily removed for compact storage.

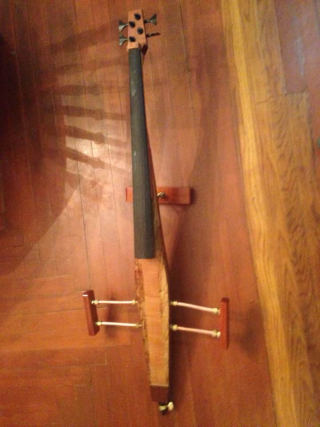
Photo 9: Here is the instrument after adding five coats of Tru-Oil, but before adding the strings, bridge, and tailpiece.

Electrifying the instrument is easy. I attach a clip on microphone made by Korg to the bridge, and I run that into a pre-amp. The output from the pre-amp can either be fed into a guitar pedal, or straight into an amplifier. The instrument actually sounds pretty darned good, but I won’t post an audio file yet, as I’ve barely begun to practice.

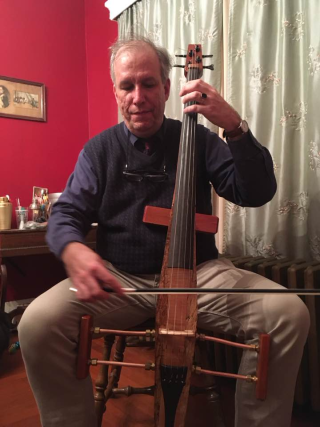
Photo 10: Here is a photo of my first test of the instrument. Note that the clip on microphone is not attached, and that the side pieces may need to be shortened slightly.

“Pantone” for Theremin and Video

I have been playing theremin for a little less than a year.  The instrument has quickly become a passion for me.  As a composer, it is desirable for me to be able to publicly perform some of my own works.  Thus, the challenge is to write a piece for an entry level performer that is still going to engage an audience sufficiently.

Setting the piece at a slow tempo allows the theremin to focus on slow lyrical lines that are within my grasp as a performer. The fixed audio part, created using Apple’s Logic Pro, serves as a compliment to the slow, lyrical nature of the theremin.  The fixed audio uses faster, often syncopated rhythms that add a surface level energy to the piece.

Another way to add energy and excitement to the piece is to add a visually engaging video to accompany the work.  The concept behind the work attempts to bridge the visual and audio worlds.  In the visual realm, pantone refers to a color classification system. In sound, I offer pantone as a description of an instrument, like the theremin, that can create any frequency that exists between its highest and lowest possible notes.

Creating a video for Pantone creates another set of problems, related to my relative inexperience as a visual artist.  Years ago I wrote a chamber opera, Into the Cautious Season, that used projected images that were similar in nature to a graphic novel representation of the plot and libretto to both set the scene, as well as to display the libretto.  I created the graphic novel version in black and white as well as a version using some color.  Inspired by the water color skies used in It’s the Great Pumpkin Charlie Brown, I used watercolor paints on the black and white images to create a limited color version.

cautious

Due to my lack of skill as a visual artist, I cannot say that the graphic novel version of Into the Cautious Season was successful.  However, I can say that it was good enough to be a proof of concept, and that I believe a version done by someone with decent illustration skills could work well. Moreover, I began to think that simple scans of single color fields of watercolor paint could make an interesting basis for a video.

For Pantone I started with nine black and white images from the patent drawings for the theremin.  Then, I used watercolors to paint single color designs that mimic the designs on top of the drawings.  After scanning the images into a computer, I then made nine glitched versions of each, by changing each image file to a text file, copying, pasting, and deleting material before changing the file back into image files.

glitch

For each musical phrase of Pantone I superimposed nine of these glitched images on top of each other in Apple’s Final Cut Pro.  I set each layer to zoom in and out and to move about independently of the other images. Furthermore, each layer was set to only let a percentage of colors through. This approach resulted in a detailed, yet slow moving texture of colors. One final detail added to the video involved adding an increasing number of visual accents that coincide with musical accents.  These were achieved by exporting specific frames as images, glitching those image files, and superimposing them for about four frames over the video.

glitchaccent

Sonically speaking Pantone is an homage to the future of my youth.  When I was a child, commercially available analog synthesizers were relatively new.  Artists like Wendy Carlos, Don Dorsey, Jean-Jacques Perry, and Isao Tomita created sonic palettes that will always sound like the future to me. In creating the fixed audio accompaniment for the piece, I emphasized timbres that emulated these analog synthesizers.

Ultimately I believe that Pantone offers several features that can engage listeners:  lyrical melodic material performed on a novel instrument, a fixed audio part that is rhythmically energetic, a sonic palette that invokes a nostalgic science-fictionesque world, and a colorfully meditative visual component filled with detail.

(in performance in Pawtucket, RI on December 4th, 2016)

(in performance in Bridgewater, MA on March 1st, 2017)

A cavalcade of podcasts

As a professional commuter, podcasts add greatly to my quality of life. When a podcast is both informative and enjoyable / entertaining, being stuck in traffic can be reduced to a mere inconvenience. Podcasts that are inspiring, and can give musicians of any skill level ideas for their next work transcend entertainment to a near necessity.

I listen to two or three podcasts that may be of interest to those involved in songwriting, recording, or film scoring.  The best of these, The Sodajerker on Songwriting, is a series of hour long interviews with highly notable songwriters including people such as: Lamont Dozier, Kenny Loggins, Richard Sherman, Paul Simon, Valerie Simpson, Mike Stoller, and Paul Williams.  The interviews are conducted by two songwriters, so the questions are intelligent, and pertinent to the songwriting process.  While the interviews are centered on songwriting issues of production, gear, and recording can come up frequently in artists who are well involved in such activities.

A similar podcast, Song Exploder, features 10 to 15 minute episodes where a major band or artist talks about the creation of a single song.  Each episode ends with the released version of the song in question.  The podcast has had numerous high profile guests, including:  Alexandre Desplat, The Lumineers, K. T. Tunstall, U2, and Wheezer.  The podcast is much more evenly split between topics involving songwriting versus production.

Finally, a third podcast that I have listened to (although not as extensively) is Sideshow Sound Theatre.  This podcast is partially fan oriented, and partially review oriented.  The hosts of the show are film music fans who are aspiring film / media composers.  The hosts pick a different theme, genre, composer, or franchise for each episode, and discuss the particular scores at hand in depth.

I have listened every episode of The Soda Jerker on Songwriting and Song Exploder.  I am currently (very) slowly working my way through Sideshow Sound Theatre.  Not every episode is inspiring, or gives me valuable ideas that I can use in my own work.  But sometimes it only takes a single idea to completely revolutionize how you approach your art.  Hearing from people involved in the same artistic endeavors as you are is perhaps the best way to broaden or advance your own skills.  Finding the time to listen to these resources is perhaps one if the best ways you can spend your time in the advancement of your own work.


Tackling Reverb

I think of reverb as being kind of like ketchup, namely the right amount is supremely tasty, a bit too much can over power and ruin the flavor.  What constitutes that sweet spot is of course personal taste, but finding the right settings to achieve that goal can be daunting, particularly considering the number of parameters in many reverb plugins.

Perhaps the simplest manner is to start with presets. Find something that kind of suits your tastes, and edit the parameters from there. However, if you want to start from scratch, and forge your own sound, some advice might be useful to get you started.

The two most basic settings for reverb are the mix (or wet / dry balance) and reverb time.  If you think of a real reverberant space, reverb time is the amount of time it takes for the sound to dissipate (technically for it to drop 60 decibels in volume).  The mix (or wet / dry balance) would be the distance from the original sound source.  For instance, having the mix near 0% (or dry be loud with wet turned down) would be close to the original sound source.  A mix level nearer to 100% (or dry being quiet, with wet turned up) would be far away from the original sound source.

When I start building reverb from scratch, I like to turn up the mix to 100%, so I am listening only to the sound of the reverb.  Once I get the sound where I want it, I can dial the mix back until I like the balance of the dry and reverberated sound.

Once I set the mix to 100%, I next set the reverb time to set the size of the virtual space of the reverb.  Do I want a small or a cavernous sound, or somewhere in between.  To sound realistic (which is not necessarily important), it is best to stick to times under four seconds.

Then I like to play with any setting that would determine the size of the room.  Subsequently I like to modify any setting that changes the tone color of the reverb, such as low frequency levels or high cut levels.  If you are looking to emulate a natural reverb sound, you want to cut out some of the high frequency components, as that frequency range tends not to reflect off of surfaces very efficiently.  Finally, I like to move on to other settings that control aspects like density and diffusion.

Again, once I am satisfied with the overall sound of the reverb, I mix in enough of the dry tone so the original sound has enough presence, and the reverb fades into the background.  During the process, you will probably adapt to the sound a bit, so most people tend to use more reverb than is necessary.  For this reason, it is advisable to listen to it again the next day when your ears are fresh and dial it back a bit if so desired.

That being said, reverb can be a great tool for hiding thin or poor tone quality (particularly on vocals).  It can also be used to mask small mistakes.  Overusing reverb in this manner as a crutch can result in you not addressing more fundamental performance, recording, or editing issues that can be fixed with a little extra experience or practice.  However, when you find a reverb sound that you like, save it as a preset (using a name that is meaningful to you, or relates to the specific project so you will be able to recall it).  Saving your own presets can allow you to build a catalog of your own sound.  But remember that a little reverb can go a long way.  Avoid slathering it on too much, unless you want something that sounds very effect-y in nature.

getting the gear monkey off your back

I get two or three emails a day containing coupons to buy new gear.  If you’re like me, this gives you the shakes.  There’s a part of me that just itches to buy gear every time I see something shiny and new.  Giving into these urges can be expensive, and can fill your drawers and closets with gadgets that seemed so necessary a year or two ago that you hardly use anymore.

I have found it useful to ask myself a couple of questions before I buy any new gear.  The first question is, “do I need it, or do I want it?”  When assessing a perceived need, there are three situations:  a piece of equipment that could result in getting more work (see also:  gigs, $$$, green, moolah, Benjamins), a piece of equipment that allows you to do something you already can do faster, or a piece of equipment that is going to allow you to do something unique that while good for your career / work may not result in income in any direct, attributable fashion.

In the case of the former situation, balance the cost of the piece of equipment versus what it could mean to you through additional work by figuring out how many jobs/gigs you would need to pay for the cost of the piece of gear in question.  If it would take too many gigs to pay it off, perhaps it is not worth it.

In the situation of a piece of gear that allows you to do something you can already do faster, ask yourself how much time would it save me per job?  Think of what your time is worth to you, but by considering how much is the minimum amount you would work for per hour.  This allows you to put a dollar amount on the amount that you ‘save’ per gig.  How many gigs would you have to do to clear the price of the piece of gear.

In the final case, where there is no easily quantifiable result, you have to do some self questioning.  What would this piece of equipment allow you to do that you can’t do already?  How would this piece of gear improve your work in such a way that it will increase your profile, or make your work more notable?  Do you really think this gadget or device will help you attain a higher level of work?  If so, it may be worth it (provided you can afford it).

If you have determined that piece of gear is not something you need, but rather is something you want, you have to ask yourself if you would buy yourself a gift that is at that price point.  You should follow that question up by assessing how long it has been since you’ve bought yourself a gift.  Again, you should keep in mind whether buying yourself a gift is something you can afford at the current moment.  Perhaps you might want to set yourself an annual budget for such self gifting to keep yourself in line.

One final idea you could keep in mind when considering a purchase is resale value.  Some gear (particularly instruments and microphones) maintain amount of resale value.  This could allow a person to use a piece of gear for as long as they want to, and resell it later to recoup some of the value for the item.  However, not all gear retains value, and some items go in and out of style. causing the value to fluctuate wildly.

If you do intend to buy a piece of equipment, and resell it later if you feel you aren’t getting as much value out of it, look on eBay to see what used instances of that piece of hardware are selling for.  Pay most attention to equipment that is truly used, and not listed as being ‘like new.’  Also, check to make sure that that gear actually sells for those prices, not simply that it is being listed at that price.  This can obviously be hard to do with newly introduced gear.  However, you can sometimes find used instances of older models of the same piece of equipment to judge value.

You can use this resale value to offset the value of the gear you intend to purchase.  However, be honest with yourself.  Do not use resale value as an excuse to buy something if you are not the type of person who typically resells old / used gear on eBay or Craig’s List.

A nice coupon or a sale is typically not a once in a lifetime opportunity.  It is fine, and in fact wise, to let it pass.  If you let the opportunity pass, and regret it, that is something you can take into account and plan ahead for the next time it is on sale (because nine times out of ten, it is only a matter of time before the item goes on sale again).

One exception is used / vintage gear.  Some pieces of vintage gear can become very rare, and can sometimes increase in value with time.  Before you buy ask yourself whether it is in good enough condition to make it practical.  Also, ask yourself if it breaks, will you be able to find someone who can fix it.  You may also want to ask yourself whether there are modern emulators of this piece of equipment, and if the emulators would be sufficient.  If you are satisfied with your answers to these questions, and buying the vintage piece of gear still seems valuable (and if it is in your budget), feel free to do so.

I’ve found these guidelines to be valuable for my own purchasing habits. While they might not work in quite the same way for you, I encourage you to at least come up with your own criteria for keeping your gear habit in check.  If I had to choose one of these guidelines as being the most important, it would be being honest with yourself about whether it is a need or a want.  Ultimately it is fine to buy yourself a gift if you can afford it, but try to be honest with yourself.  Don’t pretend you need something that you simply want.