Experiment 7: Additive Odd / Even

I’m afraid I’m not as pleased with this month’s entry as I had hoped to be. The instrument I developed worked fairly well on the Organelle, but when I used it in combination with a wind controller, it was not nearly as expressive as I had hoped. I had also hoped to use the EYESY with a webcam, but I was not able to get the EYESY to recognize either of my two USB webcams. That being said, I think the instrument I designed is a good starting point for further development.

The instrument I designed, Additive Odd Even, is an eight-voice additive synthesizer. Additive synthesis, as the name implies, is an alternative approach to subtractive synthesis. Subtractive synthesis was the most common approach for the first decades of synthesis, as it requires the fewest / least expensive components in comparison to most other approaches. Subtractive synthesis involves taking periodic waveforms that have rich harmonic content, and using filters to subtract some of that content to create new sounds.

Additive synthesis was theorized by rarely attempted since the beginning of sound synthesis. Technically speaking the early behemoth, the Teleharmonium, used additive synthesis. Likewise, earlier electronic organs often used some variant of additive synthesis. One of the few true early additive synthesizers was the Harmonic Tone Generator. However, this instrument’s creator, James Beauchamp only made two of them.

Regardless, additive synthesis involves adding pure sine tones together to create more complex waveforms. In typical early synthesizers, this was impractical, as it would require numerous expensive oscillators in order to accomplish this approach. As a point of reference, the Harmonic Tone Generator only used six partials.

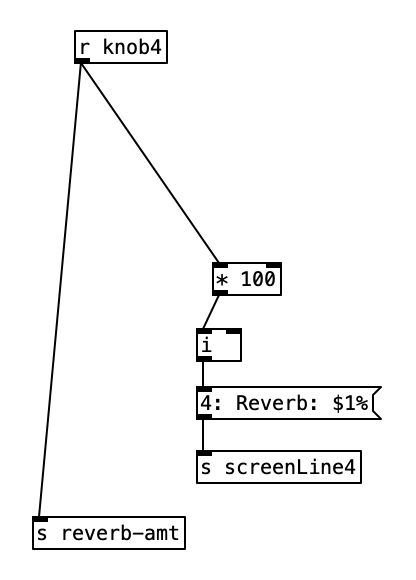
Additive Odd Even is based upon Polyphonic Additive Synth by user wet-noodle. In my patch, knob one controls the transposition level, allowing the user to raise or lower the pitch chromatically up to two octaves in either direction. The second knob controls the balance of odd versus even partials. When this knob is in the middle, the user will get a sawtooth wave, and when it is turned all the way to the left, a square wave will result. Knob three controls both the attack and release, which are defined in terms of milliseconds, ranging from 0 to 5 seconds. The final knob controls the amount of additive synthesis applied, yielding a multiplication value of 0 to 1. This last knob is the one that is controlled by the amount of breath pressure from the WARBL. Thus, in theory, as more breath pressure is supplied, we should hear more overtones.

This instrument consists only of a main routine (main.pd) and one abstraction (voice.pd). Knob one is controlled in the main routine, while the rest exist in the abstraction. As we can see below, voice.pd contains 20 oscillators, which in turn provide 20 harmonic partials for the sound. We can see this in the way in which the frequency of each successive oscillator is multiplied by integers 1 through 20. A bit below these oscillators, we see that the amplitudes of these oscillators is multiplied by successively smaller values from 1 down to .05. These values roughly correspond to 1/n, where n is the harmonic value. Summing these values together would result in a sawtooth waveform.

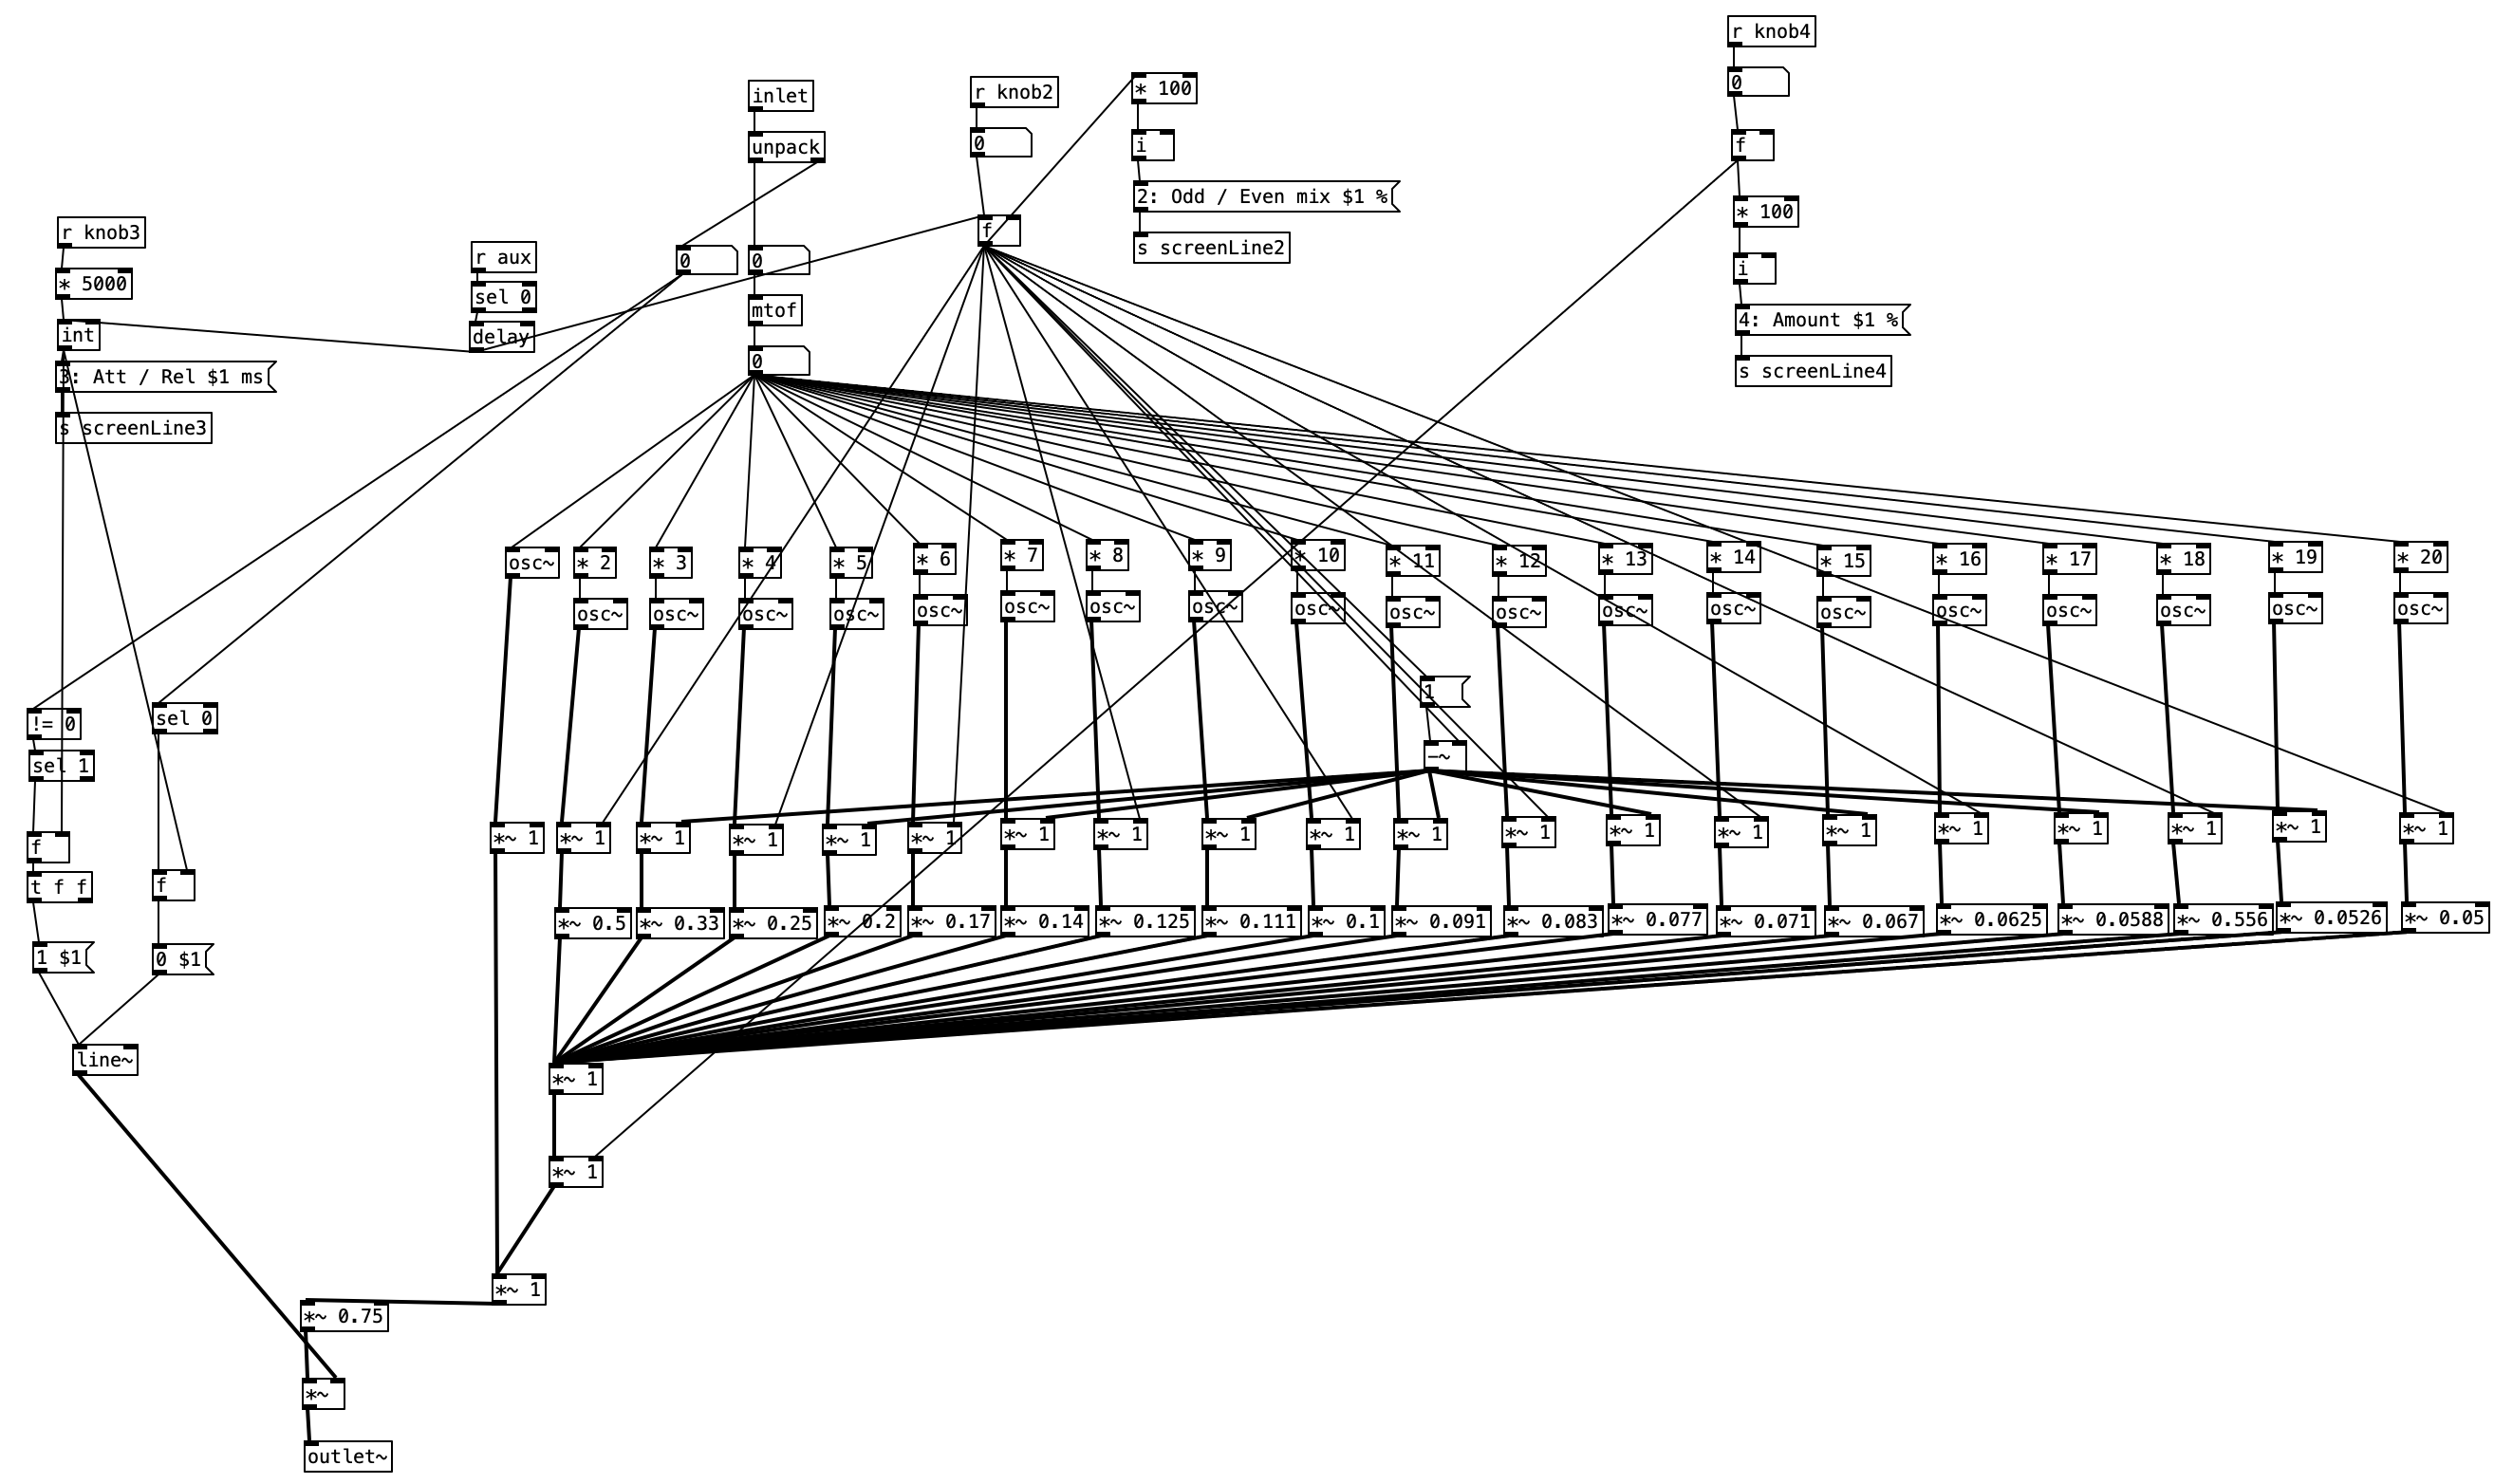
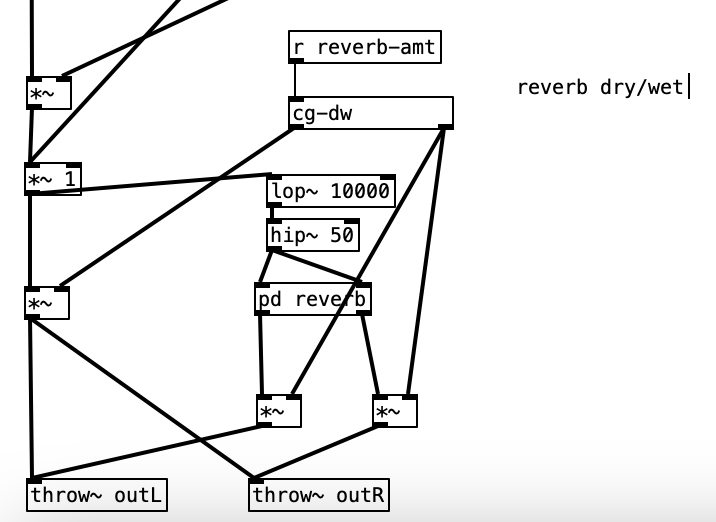
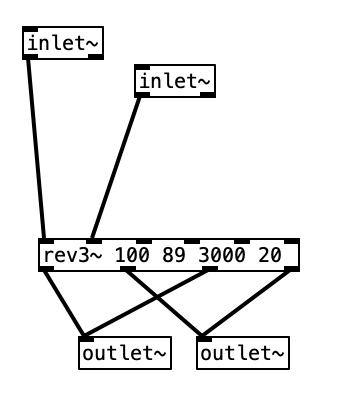
We see more multiplication / scaling above these values. Half of them come directly from knob 2, which controls the odd / even mix. These are used to scale only the even numbered partials. Thus, when the second knob is turned all the way to the left, the result is 0, which effectively turns off all the even partials. This results in only the odd partials being passed through, yielding a square waveform. The odd numbered partials are scaled using 1 minus the value from the second knob. Accordingly, when knob 2 is placed in the center position, the balance between the odd and even partials should be the same, yielding a sawtooth wave. Once all but the fundamental is scaled by knobs 2 & 4, they are mixed together, and mixed with the fundamental. Thus, we can see that neither knob 2 nor 4 affects the amplitude of thefundamental partial. This waveform is then scaled by .75 to avoid distortion, and then scaled by the envelope, provided by knob three.

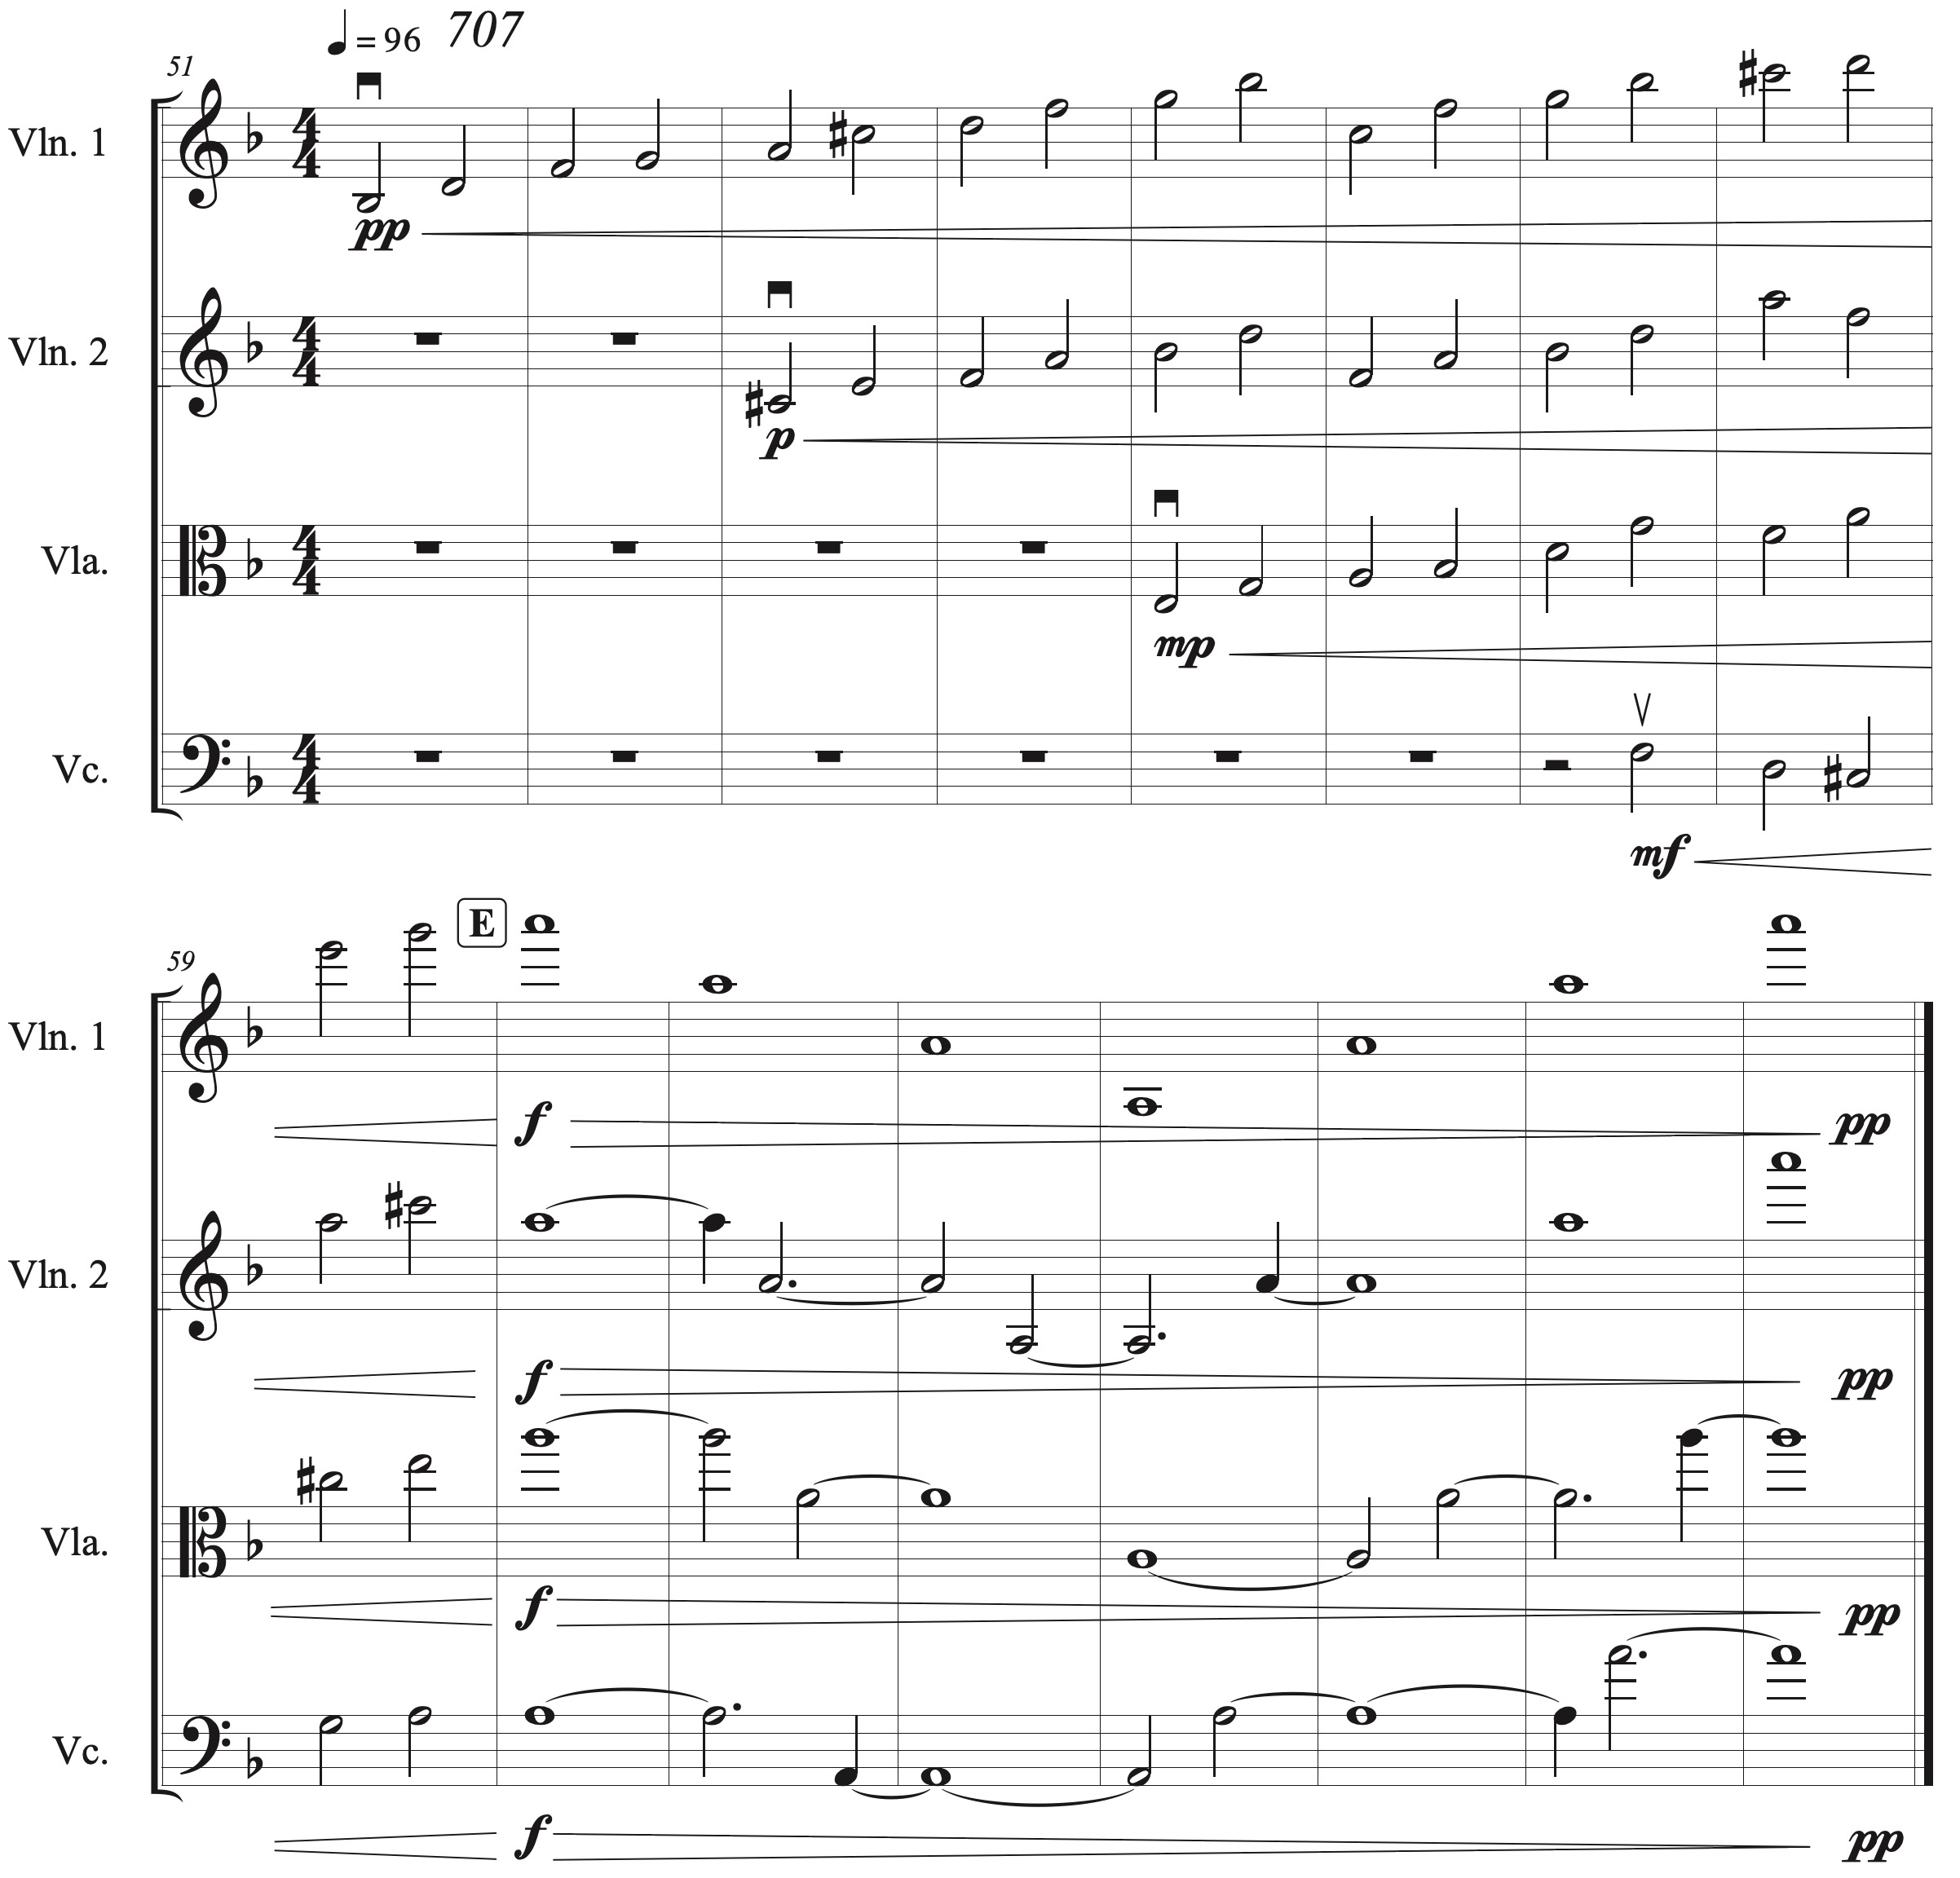
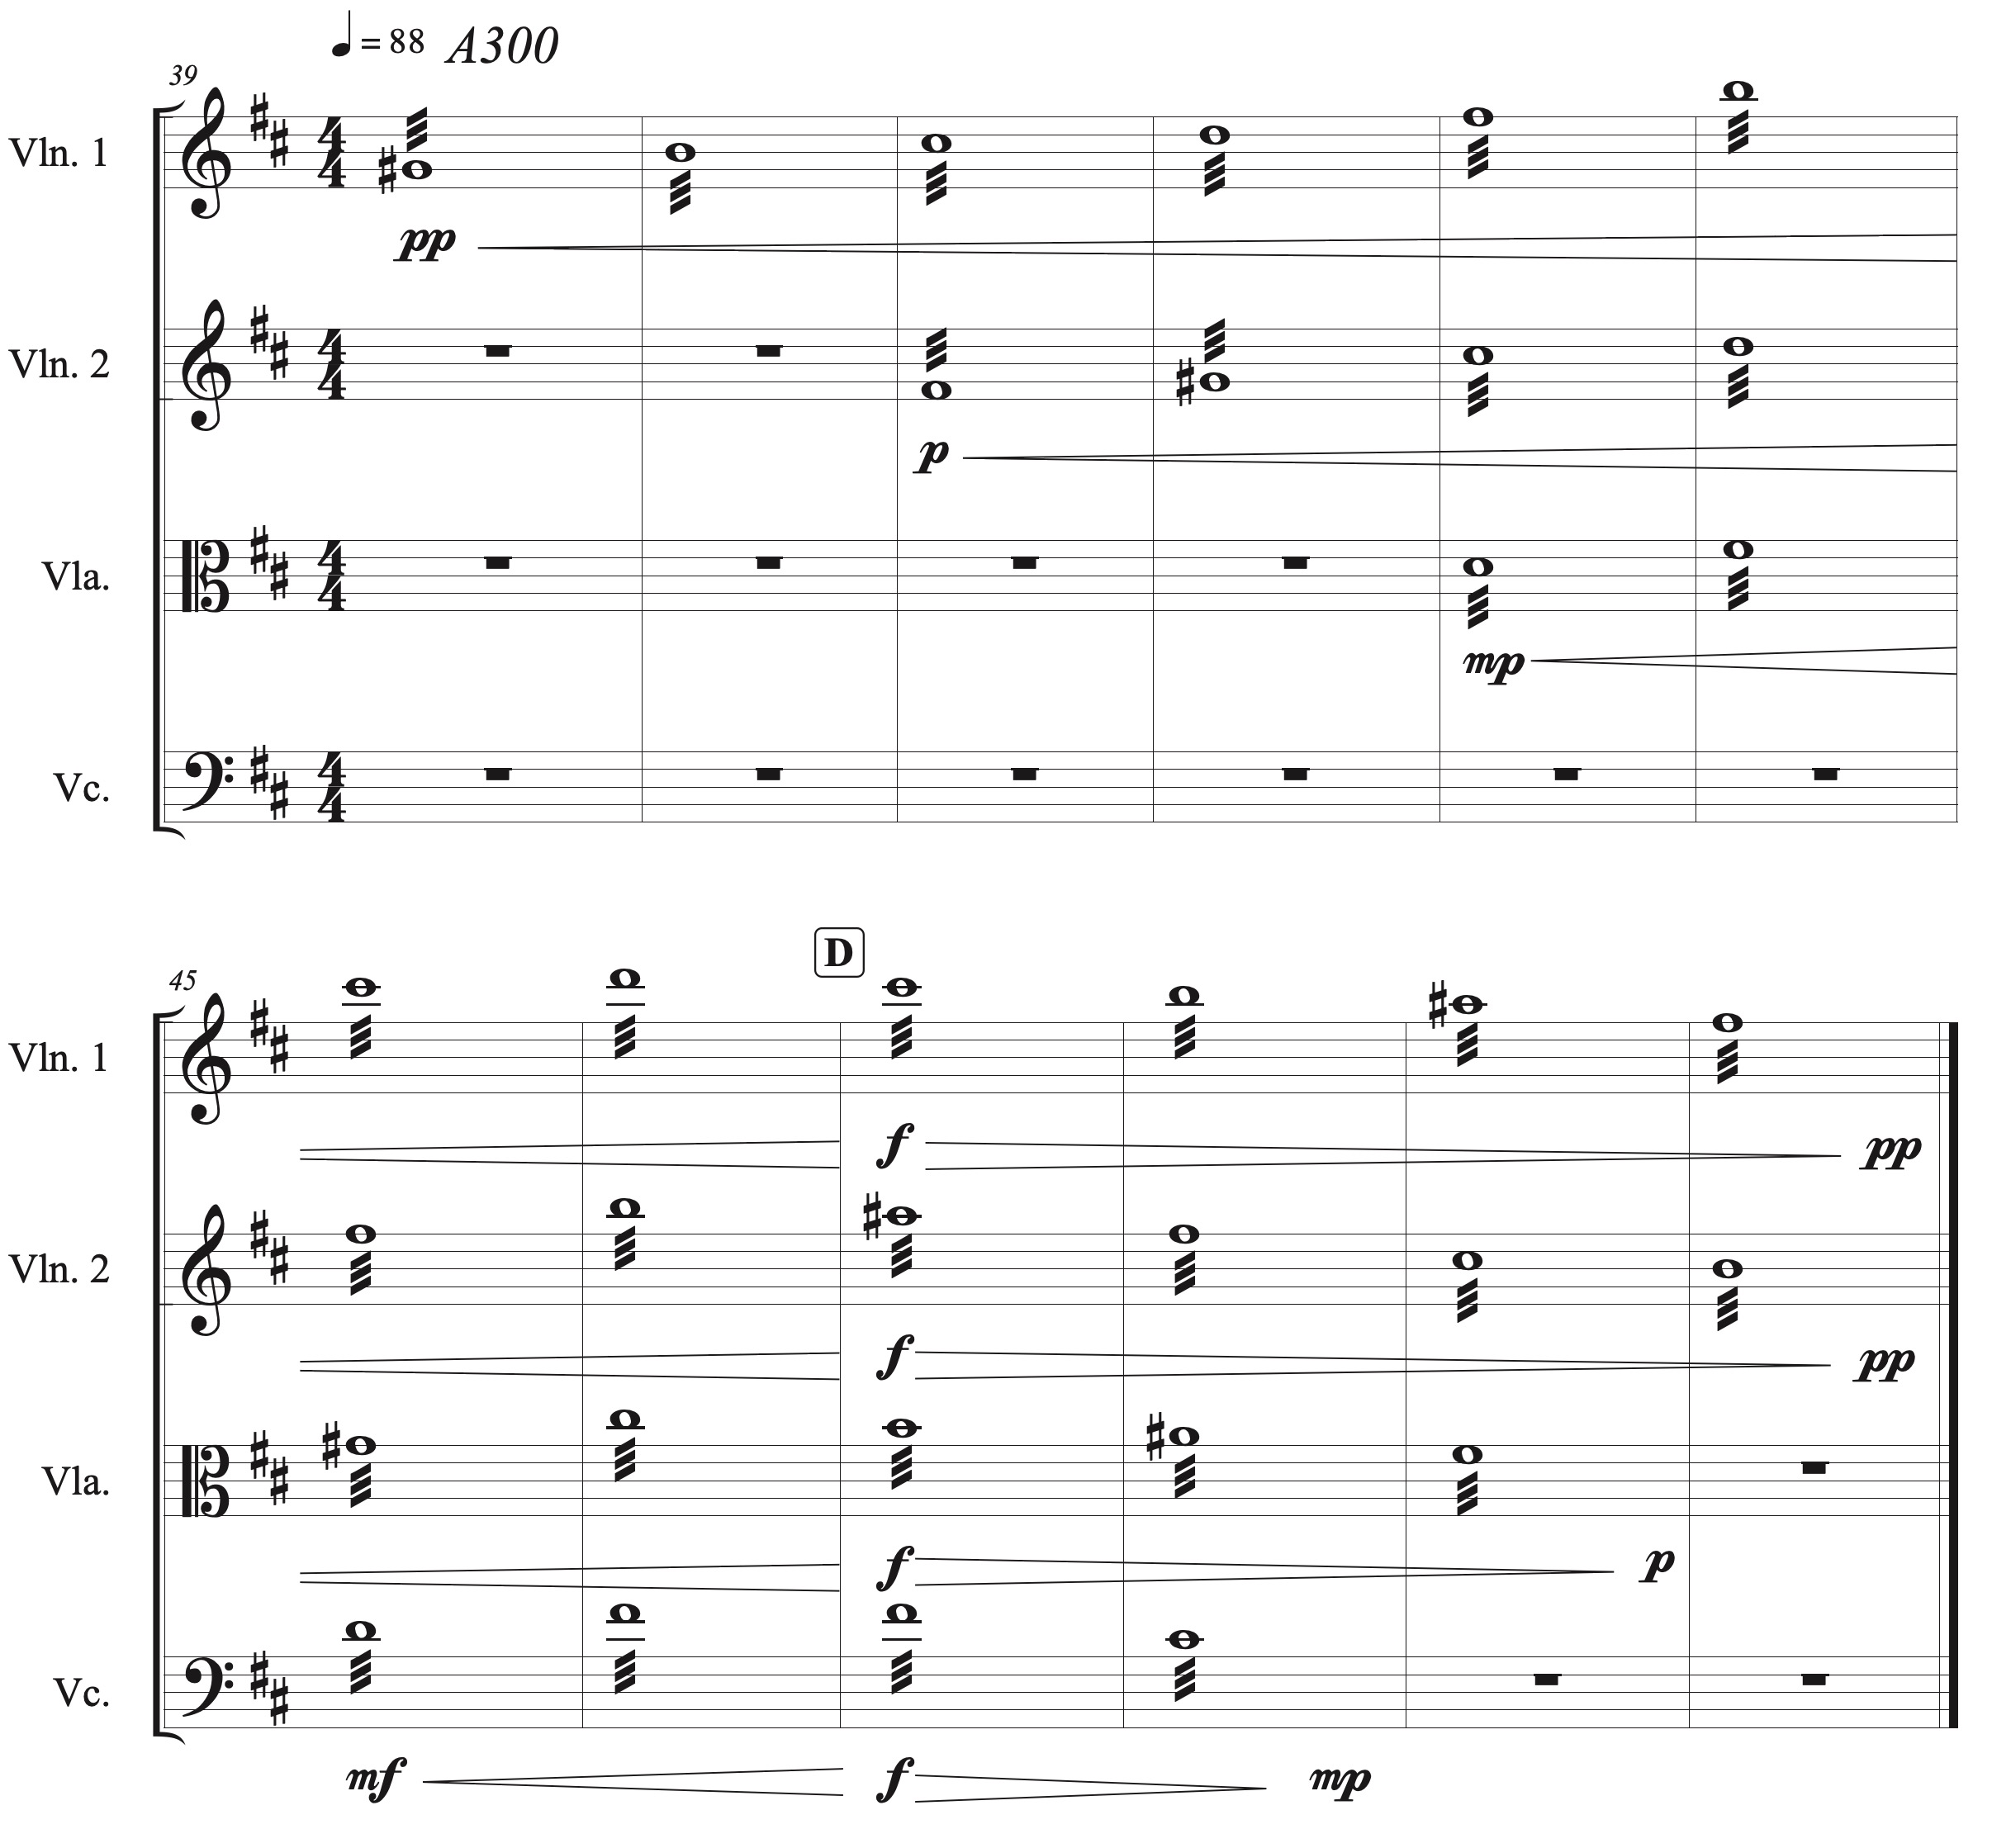
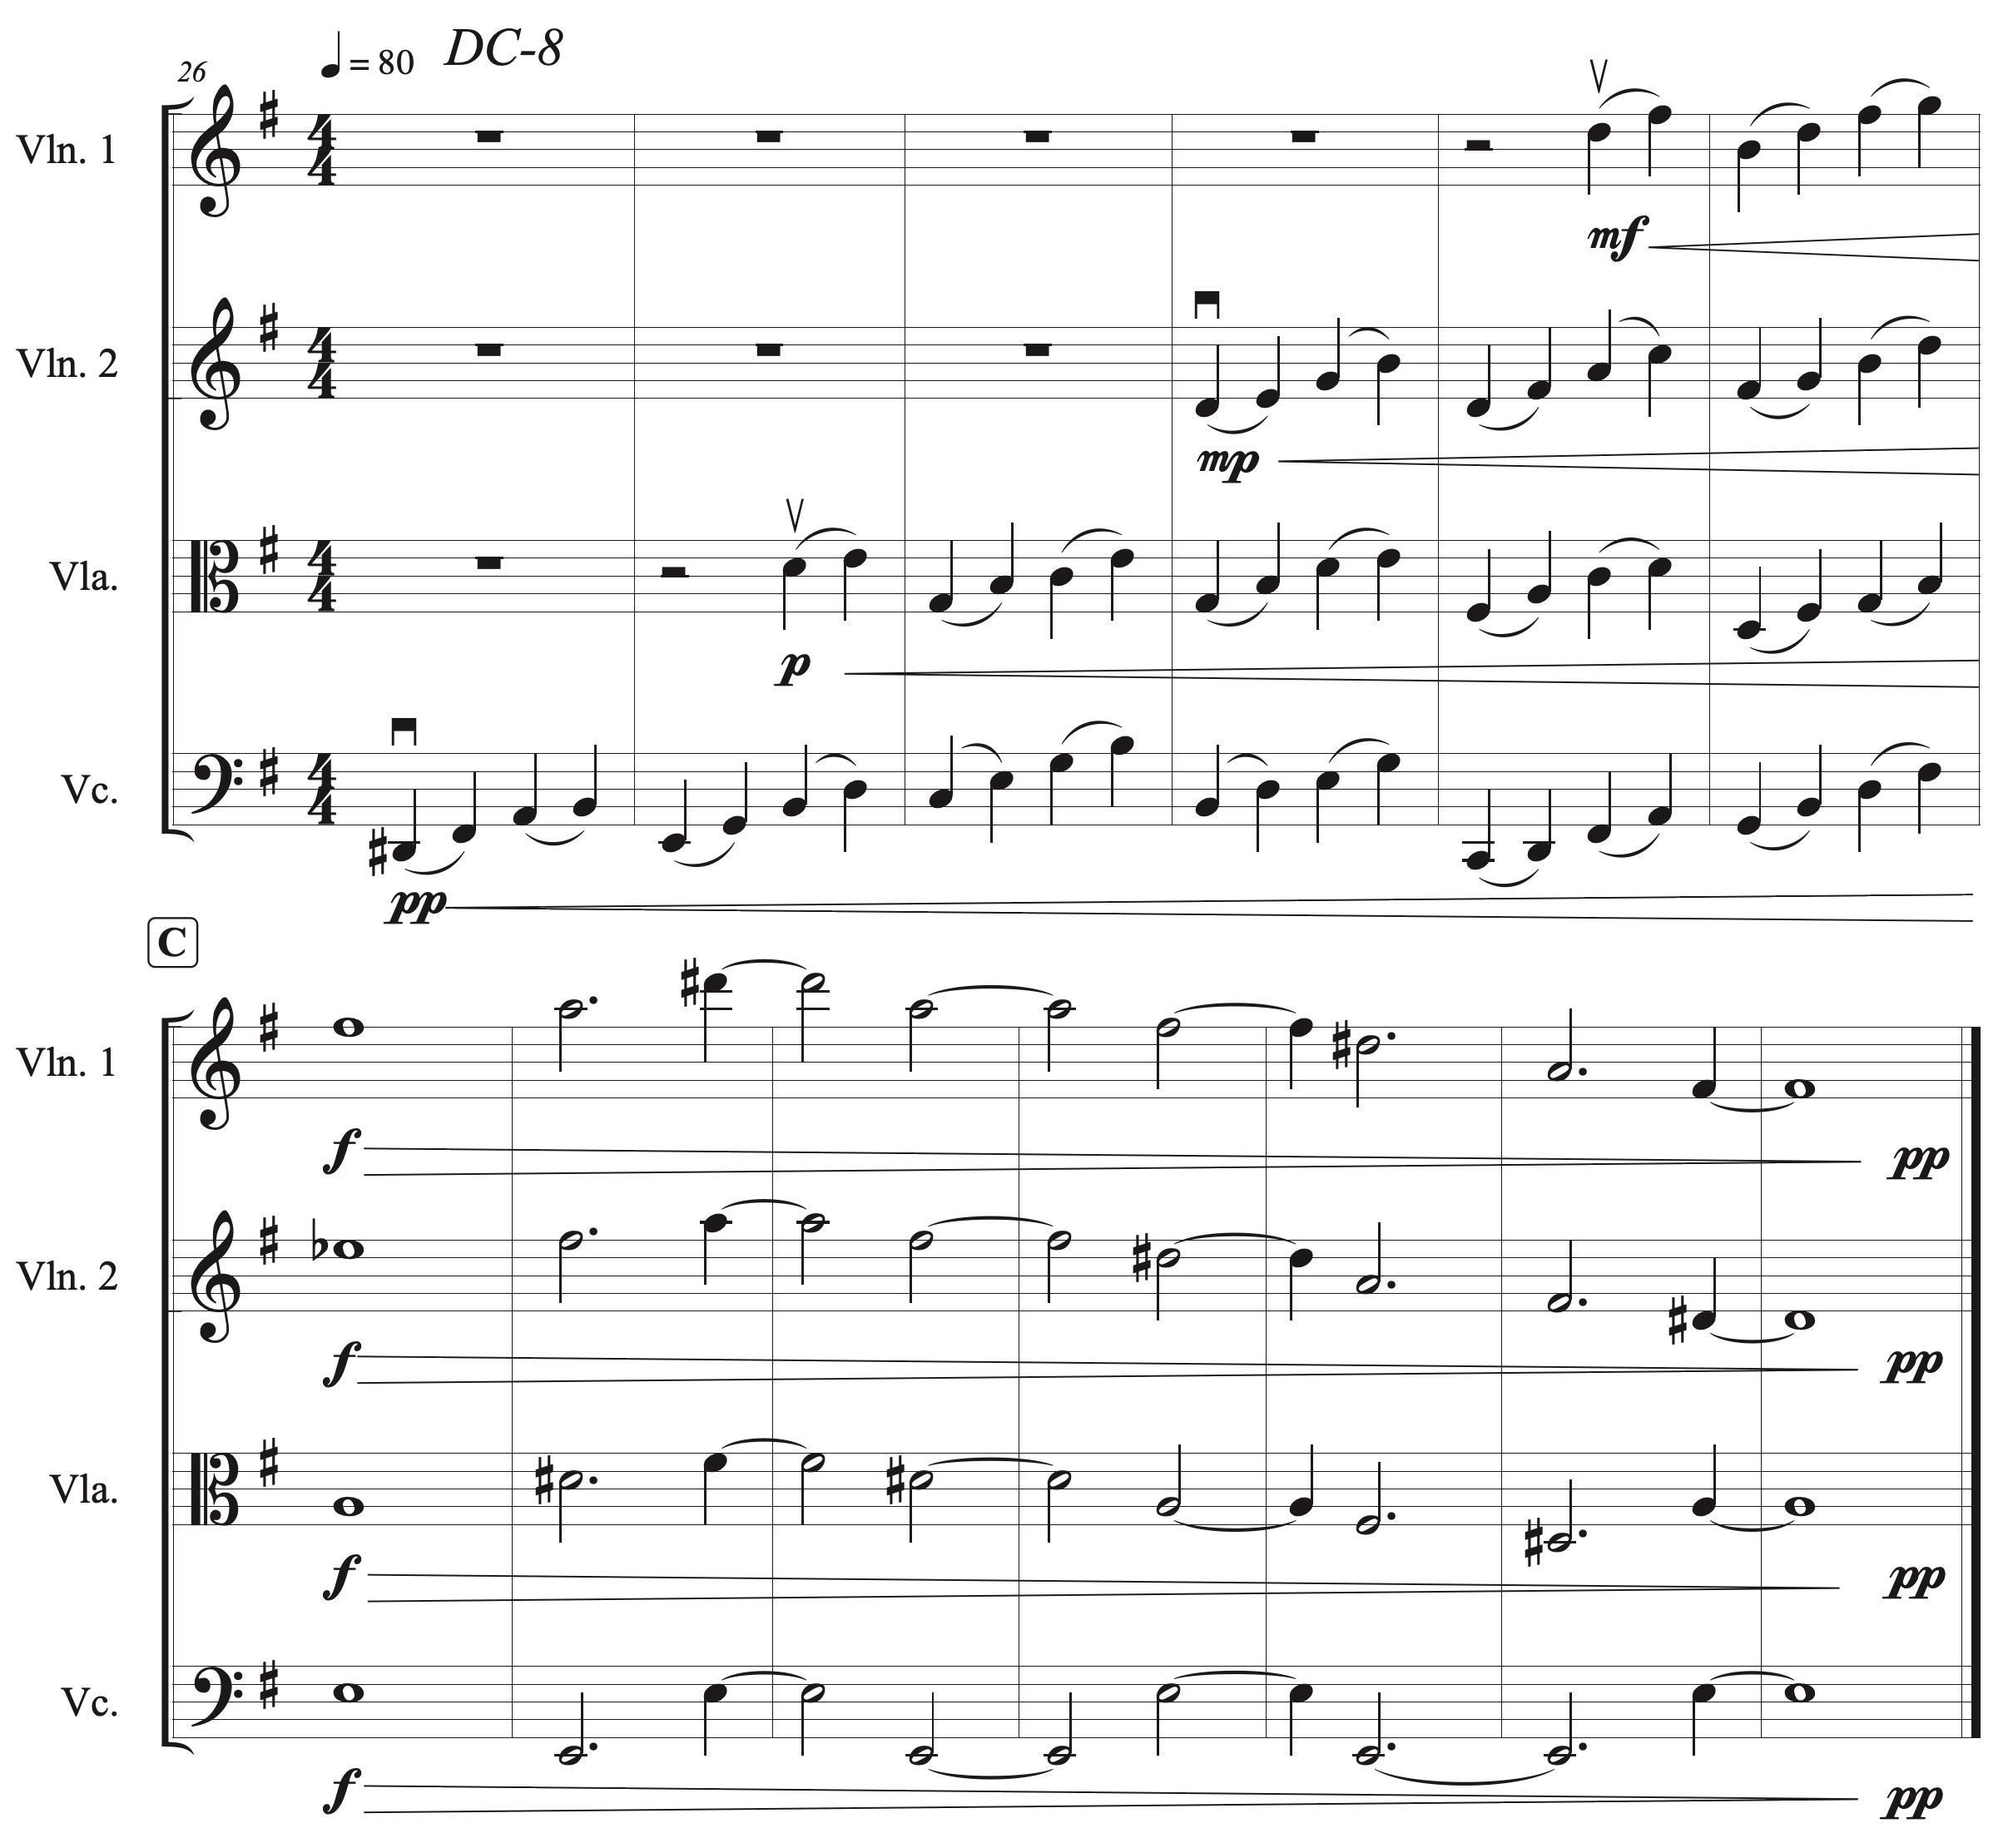
In August I had about one month of data loss. Accordingly, I lost much of the work I did on the PureData file that I used to generate the accompaniment for Experiment 5. Fortunately I had the blog entry for that experiment to help me reconstruct that program. I also added a third meter, 7/8, in addition to the two meters used in Experiment 5 (4/4 and 3/4). Most of the work to add this is adding a bunch of arrays, and continuing the expansion of the algorithm that was already covered in the blog entry for Experiment 5.

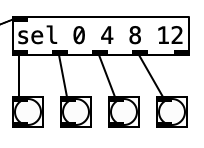
That being said, using an asymmetrical meter such as 7/8 creates a challenge for the visual metronome I added in experiment 5. Previously I was able to put a select statement, sel 0 4 8 12 that comes from the counter that tracks the sixteenth notes in a given meter. I could then connect each of the four leftmost outlets of that sel statement to a bang. Thus, each bang would activate in turn when you reach a downbeat (once every 4 sixteenth notes).

However, asymmetrical meters will not allow this to work. As the name suggests, in such meters the beat length is inconsistent. That is there are beats that are longer, and ones that are shorter. The most typical way to count 7/8 is to group the eighth notes with a group of 3 at the beginning, and to have two groups of 2 eighths at the end of the measure. This results in a long first beat (of 3 eighths or 6 sixteenth notes), followed by two short beats (of 2 eighths or 4 sixteenth notes).

Accordingly, I created a new subroutine called pd count, which routes the sixteenth note count within the current measure based upon the current meter. Here we see that the value of currentmeter or a 0 sent by initialize is sent to a select statement that is used to turn on one of three spigots, and shut off the others. The stream is then sent to one of two select statements that identify when downbeats occur. Since both 4/4 an 3/4 use beats that are 4 sixteenth notes long, both of those meters can be sent to the same select statement. The other sel statement, sel 0 6 10, corresponds to 7/8. The second beat does not occur until the sixth sixteenth note, while the final downbeat occurs 4 sixteenth notes later at count 10.

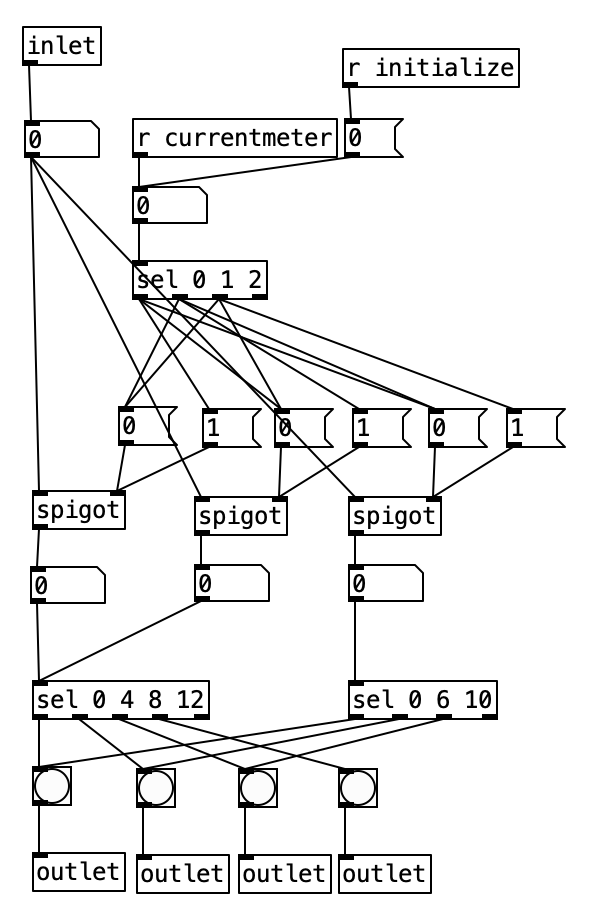
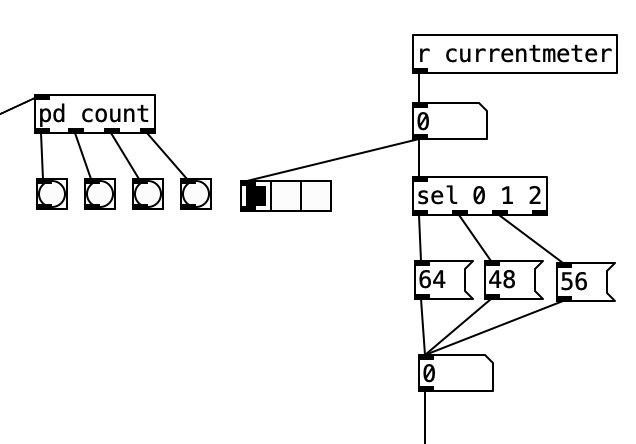
One novel aspect of this subroutine is that it has multiple outlets. Each outlet is fed a bang. Each outlet of the subroutine is sent to a different bang, so the user can see the beats happen in real time. Note that this is next to a horizontal radio button, which displays the current meter. Thus, the user can use this to read both the meter, and which beat number is active.

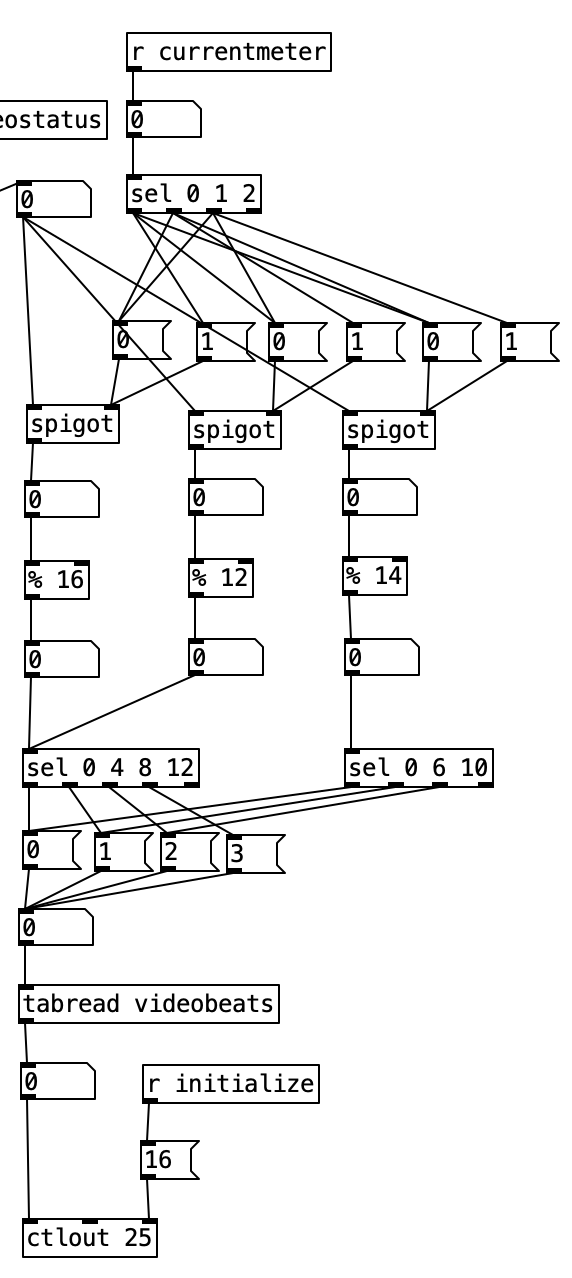
I had to essentially recreate the code inside pd count inside of pd videoautomation in order to change the value of knob 5 of the EYESY on each downbeat. Here the output from the select statements are sent to messages of 0 through 3, which correspond to beats 1 through 4. These values are then used as indexes to access values stored in the array videobeats.

I did not progress with my work on the EYESY during this experiment, as I had intended to use the EYESY in conjunction with a webcam, but unfortunately I could not get the EYESY to recognize either of my two USB webcams. I did learn that you can send MIDI program changes to the EYESY to select which scene or program to make use of. However, I did not incorporate that knowledge into my work.

One interesting aspect of the EYESY related to program changes is that it runs every program loaded onto the EYESY simultaneously. This allows seamless changes from one algorithm to another in real time. There is no need for a new program to be loaded. This operational aspect of the EYESY requires the programs be written as efficiently as possible, and Critter and Guitari recommends loading no more than 10MB of program files onto the EYESY at any given time so the operation does not slow down.

As stated earlier, I was disappointed in the lack of expression of the Additive Odd Even patch when controlled by the WARBL. Again, I need to practice my EVI fingering. I am not quite use to reading the current meter and beat information off of the PureData screen, but with some practice, I think I can handle it. While the programming changes for adding 7/8 to the program that generates the accompaniment is not much of a conceptual leap from the work I did for Experiment 5, it is a decent musical step forward.

Next month I hope to make a basic sample instrument for the Organelle. I will likely add another meter to the algorithm that generates accompaniment. While I’m not quite sure what I’ll do with the EYESY, I do hope to move forward with my work on it.

Sabbatical: Week 8 Update

Well, my sabbatical is about half over. I got a respectable amount of work done this week, all things considered. I got nine trombone phrases recorded. This included two A phrases each for A300, DC-10, and 747. I also recorded one B phrase each for 737, DC-8, & 707. Ultimately this isn’t much work for the week, but there has been a family emergency that has been keeping me busy since Tuesday. Thus, as I said it’s a respectable amount of work, all things considered.

It isn’t clear when this family emergency will be resolved. Furthermore next week my work load as a sound designer for an upcoming production of A Wrinkle in Time will be ramping up. Next weekend will be the recording session for the string parts, which means the following week will likely be focused on editing and mixing those recordings. All of this is a long winded way of saying that realistically speaking, I may not complete the trombone recordings for two to three weeks. Thus, my revised recording schedule for the remainder of the semester will likely be . . .

Week 9: Trombone
Week 10: Edit / mix String recordings
Week 11: Trombone
Week 12: Cello
Week 13: Cello
Week 14: Taishogoto
Week 15: Taishogoto

I’m still satisfied with this schedule, as cutting out many of the synth oriented tracks is fine since the backing tracks already have a significant amount of synthesizers. Even if I don’t complete much work next week, I’ll still be able to report next week, as I’ve been working on a related side project, and have been making enough progress on it that I may be ready to start releasing information on it next week.

In the interest of having some visual material, please find below the score for the string arrangement of 707. The B section of this movement is nominally in D minor, featuring the notes: D, E, F, F#, G, A, Bb, and C#. The A section in contrast only uses a single note, A.

Sabbatical: Week 7 Update

It has been a productive week for me resulting in 15 finished phrases. I finished my pedal steel work, recording one phrase each for Rotate A300, 727, DC-10, DC-9, & 747. This allowed me to get a head start on trombone recordings. Ultimately I recorded two phrases each for TriStar, 737, DC-8, 707, & DC-9.

Recording trombone is quite a challenge for me, although it is a different challenge than playing the pedal steel. The latter instrument is very complicated, and not particularly intuitive. The last time I played trombone on a regular basis was over thirty years ago. I still have a very mental knowledge of how to play the instrument correctly. That being said, my embouchure just isn’t up to the job. It is very challenging for me to play even moderately high notes. I have equivalent problems playing pedal tones (extremely low notes) on the instrument as well.

It will be interested to see if after a couple of weeks of recording on the instrument if my embouchure shows any sign of improvement. For the time being though, I will simply write the trombone passages (mainly brass hits) in a range that fits my meager abilities. Furthermore, a lot of editing, a generous portion of pitch correction, and helping of plate reverb can do wonders to hide three decades of neglect.

It has been a couple of weeks since I presented one of my string arrangements. My arrangement for A300, featured below, features the second smallest pitch collection of the nine movements of Rotate. The B section of A300 features only five notes (B, C#, D, F#, G#), while the A section features four pitches (B, C#, F#, A#). These limited pitch groups yield some unique harmonies for the arrangement.

Sabbatical: Week 6 Update

It has been quite a productive week. I was able to record 17 phrases on pedal steel guitar. I recorded two each for A300, 727, DC-10, DC-9, & 747. I recorded three phrases for DC-8 and 707. I also recorded a phrase for the center section of 737. On Saturday I booked Alumni Hall to record some piano tracks on the Yamaha C7 grand in that space. All in all I managed to record 10 phrases, two each for TriStar, 737, A300, 727, and DC-10.

Last week I explained some of the basics of how a pedal steel guitar works. This week I’ll go into a little more detail. The second movement of Rotate, 737, is nominally in F major. In the center section of the piece I decided to use 3 seventh chords: an F major seventh, a D minor seventh, and an A dominant seventh. Let’s investigate how you can do this on a pedal steel guitar. This will allow us to review what we learned about tuning and the foot pedals from last week.

Above, we see the open strings of an E9 pedal steel guitar. Playing a major seventh chord in this tuning is simple, you simply play strings 2-6 simultaneously (with the low B on the left being string 10). In order to get an F major seventh, then we’d simply play those strings with the steel over where the first fret would be.

There several ways to get a minor seventh chord. Last week I went over how you could use the first two pedals of the instrument to get a chord built on scale degree four or six. Remember that the first pedal changes all of your B strings to C#, and the middle pedal changes all of your G# strings to A. When we press just the first pedal, the E major chord we get from strings 3-6 is now a C# minor chords. Likewise, when we press the first two pedals at the same time, our E major chord is now an A major chord. We are going to use these two pedals to create a D minor seventh chord.

Let’s think about that chord in the context of C major. We could also think of that chord as being an F major chord (a IV chord) with an additional D (scale degree two). We can get a IV chord by using the first two foot pedal. The additional scale degree two we can get from string 7 (F# is scale degree two in E major). Since we are thinking in C major for this chord, we would have to strum strings 3-7 with the first two pedals down, and our steel positioned over where the 8th fret would be (C is 8 half steps above E).

How about our A dominant seventh chord? We found that major seventh chords on a pedal steel guitar are easy. Here’s where the knee levers come into play. Again, there is no standard for how many knee levers a pedal steel guitar has, nor is there a standard configuration. My instrument has three knee levers. They would be labelled LKL, LKR, and RKR. Those abbreviations stand for left knee left, left knee right, and right knee right. Thus, I have two knee levers for my left leg, and one for my right.

While there are no standards, there is some logic used in setups. For instance LKL and LKR on my instrument both affect the E strings. This makes sense because you’d never want to use both levers at the same time, which is important as it is pretty much impossible to move your knee to left and to the right at the same time. On my instrument LKL raises the E strings to F, while LKR lowers the E strings to D#. The final knee lever, RKR, lowers the D string to C# and the D# string to D. Thus, it is this knee lever that allows me to lower the D# to D, which when combined with strings 3-6 gives a dominant seventh chord. So, in order to get an A dominant seventh chord, I would string strings 2-6 with RKR engaged with the steel positioned over where the fifth fret would be (A is 5 half steps above E).

Sabbatical: Week 5 Update

Well, I’m a third of the way into my sabbatical, and the past week has been pretty successful. I’ve finished my fretless bass recordings, and have started recording pedal steel guitar. I recorded phrases for the center sections of seven movements: 737, A300, DC-8, 727, DC-10, DC-9, & 747. The fretless phrases I recorded for 737 and DC-8 replaced recordings I made last week where I wasn’t satisfied with what I played. I’m much happier with the new versions.

In terms of the pedal steel recordings, I’ve only begun to scratch the surface, recording four phrases, two each for TriStar and 737. Pedal steel is a fascinating, but very complicated instrument. I haven’t played it much in past few months, so a significant amount of time was spent tuning the 10 strings, calibrating the tuning for a couple of the foot pedals, and reacquainting myself with the instrument.

A standard pedal steel guitar has 10 strings and uses E9 tuning. This tuning system was developed by a few prominent players, including Buddy Emmons. It is called E9 tuning, as it generally resembles the notes of an E9 chord, though notice that it has both a D natural, and a D#. Notice as well that the top two strings are actually lower in pitch than the third string from the top. One of the things that is fairly convenient about the tuning system is it features four consecutive strings that form a major triad (strings 3 through 6 – with 10 being the lowest string).

In typical pedal steel playing, the players left hand puts a steel on the fretboard. Typically the placement of the steel reflects what key you are in. For instance, in G major, you would place the steel above where the third fret would be, as G is three half steps above E. In order to get other notes (and harmonies) besides those given by the strings, the player typically uses the pedals and knee levers rather than moving the steel.

While there is no standard for pedal and knee lever configurations, most instruments have three pedals, and one or more knee levers. My instrument is an old GFI SM-10 with three pedals, and three knee levers. Since this is sufficiently complicated, I will only explain the two pedals I used in recording this week. The first pedal changes all the B strings to C#s (raising the string a whole step). The second pedal changes all the G# strings to As, raising the string a half step). With these two pedals and using the aforementioned strings that form a major triad (strings 3 through 6), you can get an E major chord, a C# minor chord (using pedal 1), an Esus chord (using pedal 2), or an A major chord (using both pedals 1 & 2). If we were to think of this in terms of E major, this will get us the chords on scale degrees 1, 4, and 6. Pretty clever all in all. Perhaps next week I will go into detail about some of the other pedals and how they can be used.

Sabbatical: Week 4 Update

Last week’s work really set me up for success this week. I managed to record a dozen fretless bass phrases this week. I recorded one phrase for TriStar, 737, DC-8, and 707. I recorded two phrases for A300, 727, DC-10, and DC-9. Accordingly I only have five fretless bass phrases to record for next week. That being said, rather than get a head start on pedal steel guitar recordings, I may add more fretless bass phrases, or re-record some of the phrases I’ve already recorded in order to have more exciting bass parts.

Again, in the interest of having some visual material to share, here’s the string arrangement for DC-8. In the first six measures you can see arpeggiations of a progression in G major: B7, Em7, CM7, Em7, D7, to GM7. The final seven measures shows a static section where the upper voices slowly arpeggiate a D# diminished chord while the cello stays on an E pedal.

Experiment 6: Constant Gardener

It has been a busy month for me, so I’m afraid this experiment is not as challenging as it could be. I used the Organelle patch Constant Gardener to process sound from my lap steel guitar. This patch uses a phase vocoder, which allows the user to control speed and pitch of audio independently from each other. While I won’t go into great detail about what a phase vocoder is and how it works, it uses a fast Fourier transform algorithm to analyze an audio signal and to reinterpret it as time-frequency representation.

This process is dependent upon the Fourier analysis. The idea behind Fourier analysis is that complex functions can be represented as a sum of simpler functions. In audio this idea is used to separate complex audio signals into its constituent sine wave components. This idea is central to the concept of additive synthesis, which is based upon the idea that any sound, no matter how complex, can be represented by a number of sine wave elements that can be summed together. When we convert an audio signal to a time-frequency representation we get a three-dimensional analysis of the sound where one dimension is time, one dimension is frequency, and the third dimension is amplitude.

Not only can we use this data to resynthesize a sound, but in doing so, we can treat time and frequency separately. That is we can slow a sound down without making the pitch go lower. Likewise, we could raise the pitch of a sound without making the sound wave shorter.

Back to Constant Gardener. This patch uses knob 1 to control the speed (or time element) of the re-synthesis. Knob 2 controls the pitch of the resynthesis. The third knob controls the balance between the dry audio input to the Organelle with the processed (resynthesized) sound. The final knob controls how much reverb is added to the sound. The aux button (or foot pedal) is used to turn the phase vocoder resynthesis on or off.

The phase vocoder part of the algorithm is sufficiently difficult such that I won’t attempt to go through it here, rather I will go through the reverb portion of the patch. As stated previously, knob four controls the balance between the dry (non-reverberated) and the reverberated sound. Thus value is then sent to the screen as a percentage, and is also sent to the variable reverb-amt using a number from 0 to 1 inclusive.

When the value of reverb-amt is recieved, it is sent to a subroutine called cg-dw. I’m not sure why the author of the patch used that name (perhaps cg stands for constant gardener), but this subroutine basically splits the signal in two, and modifies the value the will be returned out of the left outlet to be the inverse of the value of the right outlet (that is 1 – the reverb amount). Both values are passed through a low pass filter with cutoff frequency of 5 Hz, presumably to smooth out the signal.

The object lop~ 10000 receives its input from a chain that can be traced back to the input of the dry audio coming from the Organelle’s audio input. This object is a low pass filter, which means that the frequencies below the cutoff frequency, in this case 10,000 Hz, to pass through the filter, which in return attenuates the frequencies above the cutoff frequency. More specifically, lop is a one-pole, which means that the amount of attenuation is 6 dB per octave. A reduction of 6 dB effectively is half the power of the original. Thus, if the cutoff frequency of a low pass filter is set to 100 Hz, the power at 200 Hz (doubling a frequency raises the pitch an octave) is half of what it would normally be, and at 400 Hz, the power would be a quarter of what it would normally be.

In analog synthesis a two pole (12 dB / octave reduction) or a four pole (24 dB / octave) filter would be considered more desirable. Thus, a one pole filter can be thought of as a fairly gentle filter. This low pass filter is put in the signal chain to reduce the high frequency content to avoid aliasing. Aliasing is the creation of artifacts when a signal is not sampled frequently enough to faithfully represent a signal. Human beings can hear up to 20,000 Hz, but audio demands at least one positive value and one negative value to represent a sound wave. Thus, CD quality sound uses 44,100 samples per second. The Nyquist frequency, the frequency at which aliasing starts is half the sample rate. In the case of CD quality audio, that would be 22,050 Hz. Thus, our low pass filter reduces these frequencies by more than half.

The signal is then passed to the object hip~ 50. This object is a one-pole high pass filter. This type of filter attenuates the frequencies below the cutoff frequency (in this case 50 Hz). Human hearing goes down to about 20 Hz. Thus, the energy at this frequency would be attenuated by more than half. This filter is inserted into the chain to reduce thumps and low frequency noise.

Finally we get to the reverb subroutine itself. The object that does most of the heavy lifting in this subroutine is rev~ 100 89 3000 20. This is a stereo input, four output reverb unit. Accordingly the first two inlets would be the left and right input. The other four inlets are covered by creation arguments (100 89 3000 20). These four values correspond to: output value, liveness, crossover frequency, and high frequency dampening. The output value is expressed in decibels. When expressed in this manner we can think of a change of 10 dB as doubling or halving the volume of a sound. We often consider the threshold of pain (audio so loud that it is physically painful to us) as starting around 120 dB. Thus, 100 dB, while considered to be loud, is 1/4 as loud as the threshold of pain. The liveness setting is really a feedback level (how much of the reverberated sound is fed back through the algorithm). A setting of 100 would yield reverb that would go on forever, while the setting 80 would give us short reverb. Accordingly, 89 gives us a moderate amount of reverb.

The last two values, cross over frequency and high frequency dampening work somewhat like a low pass filter. In the acoustic world low frequencies reverberate very effectively, while high frequencies tend to be absorbed by the environment. That is why a highly reverberant space like a cave or a cathedral has a dark sound to its reverb. In order to model this phenomenon, most reverb algorithms have an ability to attenuate high frequencies built into them. In this case 3,000 Hz is the frequency at which dampening begins. Here dampening is expressed as a percentage. Thus, a dampening of 0 would mean no dampening occurs, while 100 would mean that all of the frequencies about the crossover frequency are dampened. Accordingly, 20 seems like a moderate value. The outlets from pd reverb are then multiplied by the right outlet of cg-dw, applying the amount of reverb desired, and sent to the right and left outputs using throw~ outL and throw~ outR respectively.

For the EYESY I used the patch Mirror Grid Inverse – Trails. The EYESY’s five knobs are used to control: line width, line spacing, trails fade, foreground color, and background color. EYESY programming is accomplished in the language Python, and utilizes subroutines included in a library designed for creating video games called pygame.

An EYESY program is typically in four parts. The first part is where Python libraries are imported (pygame must be imported in any EYESY program). This particular program imports: os, pygame, math, and time. The second part is a setup function. This program uses the code def setup(screen, etc): pass to accomplish this. The third part is a draw function, which will be executed once for every frame of video. Accordingly, while this is where most of the magic happens, it should be written to be as lean as possible in order to run smoothly. Finally, the output should be routed to the screen.

In terms of the performance, I occasionally used knob 2 to change the pitch. I left reverb at 100%, and mix around 50% for the duration of the improvisation. I could have used the keyboard of the Organelle to play specific pitched versions of the audio input. Next month I hope to tackle additive synthesis, and perhaps use a webcam with the EYESY. Given that I’ve given a basic explanation of the first two parts of an EYESY program, in future months I hope to go through EYESY programs in greater detail.

Sabbatical: Week 3 Update

This was a productive week. I finished with the bass harmonica, recording phrases for the B sections of 727, DC-10, & DC-9. Thus, I was able to get a head start on recording fretless bass recordings. I was able to record two fretless phrases for each of the following movements: TriStar, 737, DC-8, 707, and 747. I was also productive outside of the recording project, finishing a grant report, a conference presentation, some sound design work, and a conference presentation proposal.

In the interest of having some visual content on the entry I’ve included the score for the string parts for DC-10. In the B section, the beginning of the example, the strings only use the notes G, B, C, D, & F#. In the A section, the strings reduce to only using G & E, ending on harmonics. This will be one of two movements that use tremolo in the string parts.

Sabbatical: Week 2 Update

Week two has not been as productive as I had hoped. Part of that is due to labor day, part is due to a trip to Boston on Tuesday, and part of it is due to a cursed plumbing job that would never end. Finally, on Wednesday, the external hard drive I use for recording started acting quirky, so I went out and bought a new drive, and spent many hours transferring about a terabyte of data to the new drive. I am glad to report that that process went well, and all my data is safe.

Before going through my productivity for the week, a bit of background on the project. The album will consist of nine pieces. Each piece is in ternary form (ABA). The lead guitar the drum machines and the automated synthesizers pretty much play throughout each piece. This material is already fairly thick and robust. For the additional instruments I am recording I plan to have them play one phrase for each section. Since I completed work on the theremin recordings last week that means there will be 27 theremin phrases on the album (3 x 9 = 27).

The reason I was able to complete the theremin recordings last week is I went into my sabbatical having already recorded many theremin and bass harmonica recordings. To complete my bass harmonica recordings I only needed to record seven more phrases. That being said, I only got four phrases recorded this week, so next week will be a light week for bass harmonica, and I will likely get a head start on recording fretless bass next week.

The four recordings I made this week were all for B sections, specifically, for: TriStar, 737, DC-8, and 707. I feel that bass harmonica is an integral part of my sound as Darth Presley. I love the sound of a bass harmonica. In fact, in terms of satisfaction per dollar, my bass harmonica is one of my favorite instruments. That being said, bass harmonicas manufactured in most countries are actually quite expensive. There are, however a few Chinese manufacturers that make budget instruments. The instrument I have is a Swan bass harmonica, which can be purchased for under $200.

Since this is a light week, I’ll comment a bit on the string arrangements. As I stated last week, I finished the string arrangements. Over the long weekend I formatted them on paper, and created parts for each of the four instruments. The recording session is booked for late October. The musicians will be listening to a click through headphones while recording, so I should be able to just drop the recordings into place once they are edited and mixed.

Each of the string arrangements covers the transition from the B section to the return of the A section. For each movement, the number of pitches used in the B section is greater to or equal to the number of pitches used in the A sections. To put it another way, the A sections have a limited number of pitches (as little as one, and no more than six), while the B sections tend to have a much greater variety of pitches (at least three, and as many as nine).

In the interest of leaving the reader with an image to look at for the week, I’ll leave you with the score for the string arrangement of TriStar. All of the string arrangements for Rotate tend to have a similar profile to this movement, that is the pitch tends to go up, and tends to crescendo into the arrival of the final section. In this case, that section uses only the note G.

Sabbatical: Week 1 Update

The first week of my sabbatical went better than I had expected. I managed to record all of the theremin parts I had hoped to, leaving me a week ahead of schedule. All in all I recorded 13 phrases:

1 phrase for Tristar
1 phrase for 737
1 phrase for A300
3 phrases for DC-8
1 phrase for 727
1 phrase for 707
1 phrase for DC-10
2 phrases for DC-9
2 phrases for 747

The majority of these phrases were recorded using a Moog Etherwave Plus to control a Behringer System 55, which is a clone of the Moog modular synthesizer from the early 1970s. A few of the phrases were recorded using the Etherwave Plus to control a small Eurorack synthesizer centered on the 2HP Vowel formant synthesizer and a the Calsynth Monsoon granular synthesizer. One of the tracks was recorded using just the Etherwave Plus, yielding a traditional theremin sound. Below you can see a patch on the system 55 using four oscillators, a low pass filter, and a VCA.

Due to the new tracks, I’ve re-released recordings of TriStar, 737, and 707. As mentioned in my previous post, I had about a month of data loss. I managed to recover the string arrangements I wrote for TriStar, A300, DC-8, & DC-10, and wrote string arrangements for Rotate 737, 727, 707, DC-9. & 747. Thus, all the arrangements are completed. They only need to be formated for printing so I can send them out to the string quartet that will be recording them. Also relevant to the discussion is my left ear is healing nicely. It may not be at 100% yet, but it is getting there.

Given that I am one week ahead in my schedule, I’m revising my schedule thusly . . .

1 Theremin
2 Bass harmonica
3 Bass harmonica
4 Fretless
5 Fretless
6 Pedal Steel
7 Pedal Steel
8 Strings
9 Trombone
10 Trombone
11 Taishogoto
12 Cello
13 Voice
14 Lyricon
15 Modular Synth